We recommend to read the installation guide carefully before setting up or consult with a contractor available near you. Also, be mindful to check with your local building codes, approvals and restrictions. In our detailed instruction guide, you will get a better understanding of deck building and designing.
For best results, please follow the specific instructions step by step.
a. Circular saw (24 tooth carbide blades).
b. Nail gun or hammer for Step-Clip™ strip fastening.
c. Cordless screw gun for pre-drilling holes, screw fastening & Stainless-Steel Fastener Clip installation.
d. Non-marring dead blow hammer or mallet for tapping boards into place.
e. A pinch bar for setting boards in tights places.
f. Always use personal safety equipment when using tools.
1. To perform properly, Deck Tech Australia Ever grain or Expression decking must be installed with proper drainage and ventilation. Ensure that:
a) The joists are level across each span and that there is a slight slant of the deck [ 3 mm for every 2.4 m] away from your home for drainage.
b) The substructure has at least 51 mm clearance above ground level.
c) Skirting or fascia does not impede airflow under the deck.
2. Where ventilation is minimal or obstructed, flow through or soffit venting must be added around the perimeter of the deck to create cross ventilation under the entire substructure to avoid accumulation of moisture and humidity.
3. Never attach DTA decking to any solid surface, watertight membrane, concrete, or existing decking.
1. Use Australian Standards joist sizing and span tables to determine best joist sizing for deck frame constructions.
2. For Joists, we recommend using H3 CCA or LOSP (90 x 45) treated Timber for joists that is strength graded to Australian Standards. Use H4 CCA or LOSP (90 x 90) Timbers for bearers.
3. Install deck framing vertically with the 45mm side in contact with the decking. Do not install decking on framing that has been installed flat with the widest dimension in contact with the decking as this may cause debris and moisture to be trapped between the framing and decking.
4. Never use DTA decking as structural members when constructing the support structure of your deck.
5. Use maximum 450mm (or less) joist spacing for Ever Grain or Expression range profiles if the decking is to be installed perpendicular to the joist.
6. Use 400mm on center joist spacing for DTA boards if the decking is to be installed at an angle (maximum 45° angle).
7. Confirm that joist sizing and spacing is compliant with local and state building code agencies.
8. If heavy equipment is going to be installed on the deck such as a hot tub, consult the equipment manufacturer for specific requirements for framing and support.
9. If a “breaker / divider board” or “picture frame” deck installation technique is utilized, the board(s) that will be installed parallel to the deck joists will require additional framing and should also be shimmed approximately 3.2mm, depending upon framing conditions, to match the crown height of the adjacent decking running perpendicular to these boards.
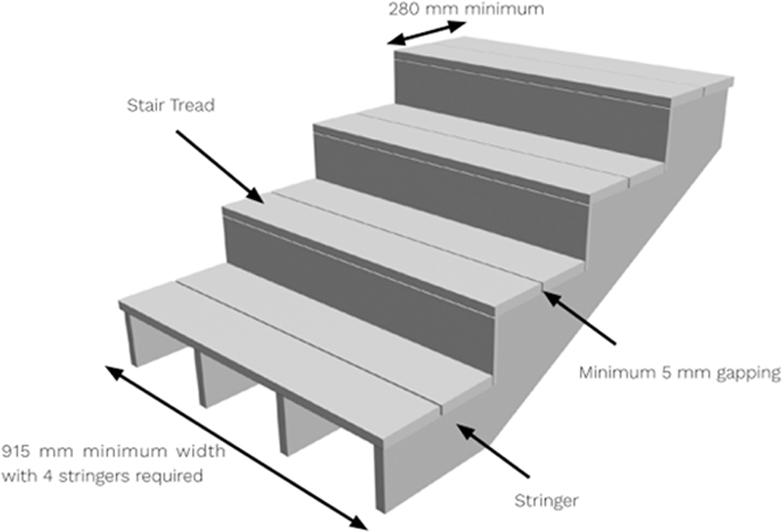
1. Do not space stringers wider than 200 mm on centre for Ever grain profile decking on stair treads.
2. Overhang for stair treads must not exceed 51mm.
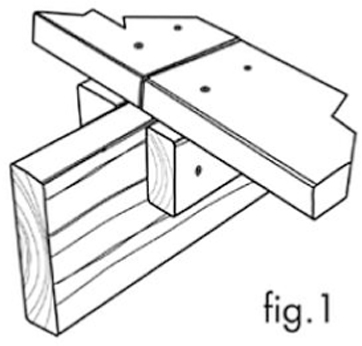
When the design of the deck requires a run that is longer than the board length; or it is a unique design, blocking (“sistering”) or additional framing is required. (Fig. 1)
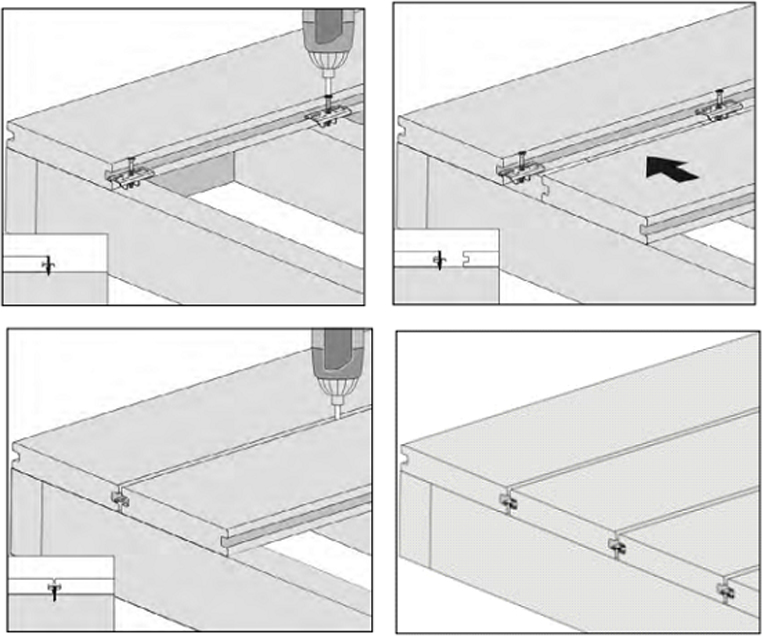
1. When installing Ever grain or Expression profile deck boards using any of the fastening methods outlined below,
Always space boards to provide the following minimum gaps to allow for these changes:
a. Side to Side… 5.5 mm. (Stainless-Steel Fastener and Step Clip™ hidden fastening systems will automatically set this spacing)
b. End to End… typically 4.5mm depending on board length and temperature (see Chart 1 - “Deck Spacing”).
c. Structure… typically 6.5mm between all decking and any structure or post (see Chart 1 - “Deck Spacing”).
Note: If the deck is located near or around a tree, be sure to allow for future growth of the tree.
We recommend that you lay out the deck boards before final installation to ensure an acceptable colour mix. DTA™ Hardwoods Collection colours feature a variegated appearance with contrasting light and dark shades of colour. Laying out a preferred pattern of deck boards before installation will help to achieve a desired appearance.
There are 2 methods that can be used to fasten DTA Ever grain or Expression ranges of decking.
• Store Stainless-Steel Fastener Clips indoors before use. Fastener Clips install best between 4°C and 27°C.
• Use a non-marring dead blow hammer as necessary to tap the Stainless-Steel Fastener Clip into the slot.
• A non-marring dead blow hammer can also be used to help secure the next Ever Grain or Expression board into place.
• If the joists are uneven, apply pressure to the deck board where it does not touch the joist. As pressure is being applied, tap the board into the Stainless-Steel Fastener Clip using the non-marring dead blow hammer.
• In the case of a low joist, shim the Stainless-Steel Fastener Clip as necessary to seat in the slot in the edge of the deck board.
• Take a measurement of the total width of the installed boards to make sure they are parallel every 3-4 courses.
• Walking along joists and non-secured deck boards can be dangerous and is therefore not recommended.
• Use a non-marring dead blow hammer as necessary to tap the Stainless-Steel Fastener Clip into the slot.
2. Installing Deck Tech Australia Ever Grain and expression range boards with steel Hidden Fastener System:
a. Use #10G x 70mm capped composite deck screws when installing DTA Ever grain Collection or Expressions profile decking.
b. When using non-capped composite decking fasteners (as outlined above), pre-drill and countersink for the screw size (#8 x 70mm typical.)
c. Two fasteners are required at each joist, one on each side of the board, regardless of the joist spacing.
d. Drive fasteners straight and directly through the deck boards at a 90° angle to the decking surface.
Do not “toe nail” or drill at an angle.
e. Never place fasteners closer than 16mm from the edge or ends of the board.
f. For the best appearance, use a white chalk line to ensure straight fastener lines. Coloured chalk can stain the decking and can be very difficult to remove.
g. When using Hidden Fastening System with surface screws and plugs, please refer to the instructions on the container to ensure the most up-to-date installation method.
• In the case of a low joist, shim the deck board as necessary before securing the deck board.
• Take a measurement of the total width of the installed boards to make sure they are parallel every 3-4 courses.
• Walking along joists and non-secured deck boards can be dangerous and is therefore not recommended.
1. Fasten fascia and riser boards using #8G x 50mm Stainless-Steel capped composite deck screws. Use three fasteners equally spaced across the width of the fascia board at the top, middle and bottom locations of the board (2 fasteners for riser board) and spaced approximately every 305mm along the length of the board. Never place fasteners closer than 16 mm from the edge or ends of the board.
2. When decking boards are installed picture framing the deck, fasten the fascia board to the rim joist, leaving a 3.2 mm gap between the top of the fascia and the bottom of the deck boards. Decking boards should not overhang the outer rim joists by more than 51mm.
3. When decking boards are installed without picture framing the deck trim the deck boards so they run past the outer rim joists by less than 51 mm. Fasten the fascia board to the rim joist, leaving a 3.2mm gap between the top of the fascia and the bottom of the deck boards.
Note: Never Install fascia by drilling into the decking. Always install the fascia into the joist and always pre-drill and counter sink the fascia board.
DTA capped composite decking will expand and contract slightly due to temperature change. Use the chart below to determine the spacing between board ends. A gap of at least 5.5mm is recommended between deck boards and fixed elements like foundations, walls, pool edges, etc. If the deck is located near or around a tree, be sure to allow for future growth of the tree.
4-13 - 6.4mm
14-21 - 4.8mm
22-35 - 3.2mm
36-43 - 1.6mm
Over 43 -0.8mm
1. To maintain the appearance of your DTA Ever grain or Expressions decking… sweep periodically and clean spills with soap and water. Additional care and cleaning instructions are available online at dtaus.com.au/resources.
2. The use of pressure washers is not recommended unless using for low pressure (1600 psi or less with fan tip) wetting and rinsing. High pressure washing may damage the surface of the decking. Always test all cleaning products on an inconspicuous area before using on the entire deck surface.

ADDRESS - 401 Victoria Road, MALAGA, WESTERN AUSTRALIA, 6090.
E- MAIL - sales@dtaus.com.au
MOBILE -
(+61)422 922 220
OFFICE - (+61)8 6478 2820

